Translate this page / Traducir esta página

Search This Blog

From the Kitchens of Pancho Villa has been awarded the honor of "WINNER" in the "Cookbooks: International" category of the 2014 International Book Awards!

Saturday, October 15, 2011

COCONUTS (isn't that a Marx Brothers movie?)

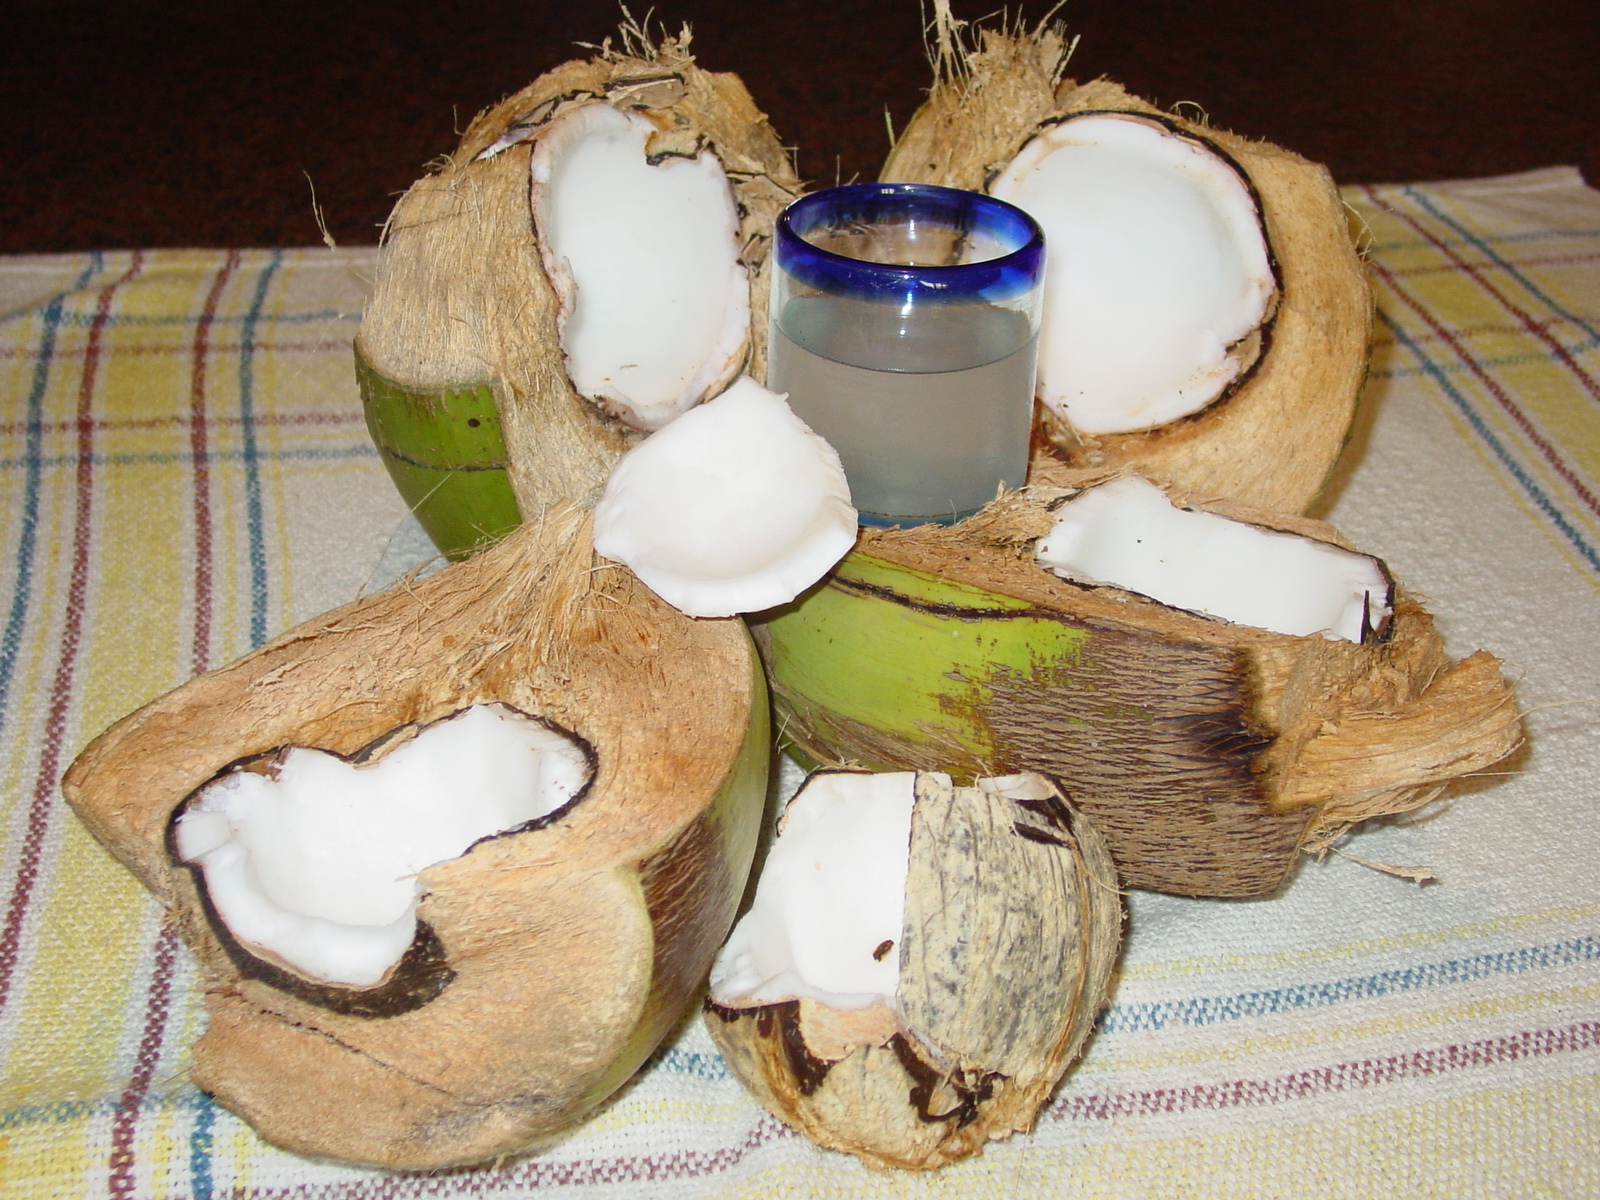
Yesterday the young maintenance man from the home across the street came over with a treat for me. Just the day before the crew was out to trim the coconut palms and remove all the coconuts in preparation for fall. He had a whole armful of fresh coconuts for me! He had used his machete to hack off the top of one so that I could put in a straw and drink the coconut water. If you have never had this treat, I am sorry for you my friend......... Rush right on down to that grocery store and do yourself a favor........buy a fresh coconut and try it! I had to sheepishly take the other coconuts back to him though, because I needed him to cut open the thick outer husk for me. I have taken a photo of them and you can see how thick this husk is. Almost impossible to get off unless you have an extremely sharp machete. Juan keeps his in his belt as it is a multi-purpose tool here.


When you break open a coconut, the clear liquid, coconut water, inside is a refreshing treat, but it is not coconut milk. To savor this sweet beverage, poke a hole in 2 of the 'eyes' of the coconut and either insert a straw (that is what we do here) or pour it into a glass. It actually is good at room temperature, but amazingly refreshing if it has been refrigerated. Try it!

To open a coconut, use the back of a heavy knife to break the outer shell. If you have already taken the coconut water out, then you shouldn't have a big mess. If you haven't taken it out, break the coconut over a large bowl. Hit it hard with your knife back all round the center of the coconut until it breaks into halves.

After you have it in large pieces, there are two ways to remove the coconut meat.
  1. You can heat the shell of the broken coconut, on a gas burner for a few minutes to loosen the meat. Make sure you have the shell side on the burner not the coconut meat. On a wooden board using a clean screwdriver (I have one specifically for use in my kitchen) place the blade between the meat and shell and pry to separate the two. NOTE: wrap the hand you use to hold the coconut in a thick towel so you do not cut yourself. The shell is very sharp and so is the screwdriver.
  2. I do not bother to heat the shell, I just use the screwdriver to pry the meat away.

Your coconut is ready to be used as you like. It can be shredded and toasted. or.......


MAKE YOUR OWN COCONUT MILK

You will need coconut (unsweetened) and warm water.

For one coconut you will need 4 cups of hot water (not boiling). Place coconut in your food processor or blender. Blitz until it is in tiny pieces or looks shredded. Add the hot water and continue to blitz until it is well pureed. Let sit for 5 minutes. Place a piece of cheesecloth in a strainer over a bowl. Pour the pureed coconut into the cheesecloth. Wrap up and squeeze as much of the milk out as possible. This is the coconut milk. Use this instead of the canned stuff with all the junk in it that you normally buy. Put it in a jar in the fridge, or use it immediately in curry, drinks, sauces, or a smoothie! The coconut can be used again in baking, ice cream, anything you would normally use coconut for. The coconut can be frozen for later use.


Friday, September 30, 2011

Fruits and Vegetables, How to Wash


For at least the last 25 years I have been obsessed, yes, I think that is the word for it, with washing my fruits and vegetables with soap and water before I put them in the fridge.

Many years ago I was headed into the grocery store to do my usual weekly shopping. In the parking lot I passed a woman who was changing her baby's poopie diaper in her car before she went into the store. It was obviously a poopie diaper by the way the mother had to repeatedly wipe the bum to remove the residue.

I happened to meet a friend while I was close to the mother's car. We stopped to chat before I continued into the store. For some odd reason, I watched the mother finish her duty, pick up her baby and start for the store. She didn't use baby wipes for her hands so I assumed she would go to the restroom to wash her hands. Well, I was wrong!

My friend and I had just finished chatting and I walked into the store behind the mother. She put her baby in the cart and headed for the produce section of the store. Wait, the restroom is on the other side by the greeting cards!!! Not only did she not wash her hands or disinfect them, but she started handling fresh fruit! Holy crap! (sorry about that) I did my shopping and from that day to present, I wash all of my fruits and veggies with soap and water! Bananas, apples, pineapple, potatoes, even broccoli!

I use a mixture of dish soap and water on a clean sponge or cloth. Scrub it all around and rinse it. The broccoli is a little different. I put some soap and water in a large plastic bowl and swish it around, rubbing the top of the florets. Then rinse it very well under running water. You are not using enough soap to taint the flavor and because you are rinsing immediately, your family won't even know you used soap.

As back-up for my way of thinking, here is an article from USA Today that I am including.

Think about all the different people who have handled your produce. From farm workers to packers to retailers to customers. How many of those had a cold and coughed or sneezed on your food. Pretty disgusting to think about. You can protect your family by taking this one small precaution.

Kind of sure if you went to the bathroom before handling food, you would use soap to wash your hands not just rinse them under running water! 

Here are some more experiences from the readers and followers of this blog.  We may all learn something from them.  That is, after all, the reason we are here!


Leslie writes:
To be honest, this is a great idea, and we do it too!
I used to work at a grocery store, and aside from the 'known' cart problems, what you aren't seeing is what happens IN the produce back room. I've seen entire crates of tomatoes or heads of lettuce being dropped onto the floor. Floors that are covered with dirty water, other rotting produce material and lord knows what else. It is then picked up, and put right back into the crate and hauled out and put on the shelves. Yep...after seeing that...EVERYTHING gets a soap and water bath! And doing that, really helps on broccoli. Those little worms tend to let go quickly while they're trying to hide among the florets, sneakly lil buggars! :)

Tuesday, September 27, 2011

Tomatoes, tomatoes, tomatoes............

Tomatoes coming out of your ears?  Read on......

Now that Fall is almost here, you gardeners are probably sitting on a bumper crop of tomatoes.  You have given them to the neighbors, taken boxes of them to work, and still they keep coming.  You want to can some, but the peeling, sterilizing jars, and water bath, there just isn't enough time to do it all.  I may have an easy solution for you.

The tomatoes here in Mexico have a tough skin and they cannot be peeled the conventional way by dipping them in hot water then in ice water.  The skin just stays put.  The cooks here have a method of their own to get around this problem.  Pop them into boiling water until the skins split, then blitz them in the blender, skins and all.  The skins just disappear in the puree.  You can do the same thing.  

Wash your tomatoes to make sure you have no dirt on them.  Put a large pot of water on to boil.  No salt needed.  When the water is boiling, drop the tomatoes into the water and let them just hang out in there until their skins split.  Remove them with some tongs and put them in a blender.  No need to cut out the stem ends either.   Do not add additional water.  

At this point, you can also toss in some basil, thyme, garlic, salt, or anything you have from the garden.  Puree until it is the consistency you like. 

Pour the puree into freezer storage bags or containers and freeze.   Make sure to label the puree if you have added herbs so it can be easily identified. 

Use this any way you would usually use tomato puree.

You will do in a few minutes what it took you all day to do before.  

Sunday, September 25, 2011

Chicken Fettuccini and Shrimp Fettuccini

An easy AND delicious dinner on Monday after slaving all day on Sunday for a feast with the family would be a nice start to the week.  Don't you think?  Keep reading, I have the answer for you....


These two dishes, chicken fettuccine and shrimp fettuccine are classics! However, you will not recognize them as Mexican food. I'm serious! I made both one night for friends who own a restaurant and they now have both on their menu. They call them Karina's Chicken Fettuccine Especial, and Karina's Shrimp Fettuccine Especial. You will savour the mild flavors of celery, onion, garlic, shrimp (or chicken), chipotle and cheese. Each ingredient adds an additional layer of flavor to the overall dish. I am excited for you to try them. Please let me know which version you made, the chicken fettuccine or shrimp fettuccine and how you like it and. Enjoy!!

Karina's Chicken Fettuccine Especial


Makes 4 servings


12 ounces fettuccine noodles- make sure it is good quality pasta
3 Tablespoons olive oil
1/2 cup celery, diced
1/2 cup onion, diced
1/2 teaspoon salt
1 clove of garlic, minced
2 chipotle chiles in adobo, very finely minced (optional) **


2 single chicken breasts (or 1 double), no skin or bones. Cut into 1 inch cubes.
8 ounces cream or half and half (NOT heavy whipping cream)
fresh ground black pepper, to taste, or about 5 cranks on your grinder
1 lime, juiced
1/2 cup Parmesan cheese, grated (use this ONLY if you do not use chipotles)


Heat a sufficient amount of boiling salted water for the pasta. Drop the pasta in and stir it to make sure all the strands of fettuccine are separated. Cook until al dente - with a bite, not mushy.


While the pasta is cooking, pour the olive oil in a large heated frying pan. Add the celery. Sauté for 2 minutes, then add the onion. Turn down the heat to low. You do not want the celery and onion to brown, only remove the crunch. Add the salt, this will bring out the moisture and help you in your quest not to brown.


When they are translucent(ish), add the garlic and chipotles. Stir well to combine.


Drop in the chicken cubes. Sauté until the chicken is cooked through, but still juicy. About 7 minutes should do it. If you have some large cubes, take one out and cut it in half to check for doneness. If it is still pink, add a minute to the cooking time. Remember that chicken breasts cook very fast and you don't want to end up with shoe leather, so please be careful not to overcook it.


Pour in the cream, grind in the pepper, and squeeze the lime over the chicken. Give it a good stir. Allow the cream to heat for 1 minute then turn off the heat.


With tongs, lift the pasta from the water and immediately add it to the chicken mixture. This adds just a wee bit of cooking water to the cream so it doesn't get too thick. Mix the pasta by turning it over and over in the sauce until it is completely covered. Serve.


NOTE: If you do not use the chipotles, use 2 limes and the Parmesan cheese. The chipotle chiles do not make the sauce spicy hot, they just give it a nice smoky chile flavor.


KARINA'S SHRIMP FETTUCINI ESPECIAL


Makes 4 servings


12 ounces fettuccine noodles- make sure it is good quality pasta
3 Tablespoons olive oil
1/2 cup celery, diced
1/2 cup onion, diced
1/2 teaspoon salt
1 clove of garlic, minced


10 ounces of cleaned and deveined shrimp, fresh or frozen, (if frozen, defrost in cold water)
8 ounces cream or half & half (NOT heavy whipping cream) 
fresh ground black pepper, to taste, or about 5 cranks on your grinder
2 limes, juiced
1/2 cup parmesan cheese, grated

Heat a sufficient amount of boiling salted water for the pasta.  Drop the pasta in and stir it to make sure all the strands of fettucini are separated.  Cook until al dente - with a bite, not mushy. 


While the pasta is cooking, pour the olive oil in a large heated frying pan. Add the celery. Sauté for 2 minutes, then add the onion. Turn down the heat to low. You do not want the celery and onion to brown, only remove the crunch. Add the salt, this will bring out the moisture and help you in your quest not to brown.

When they are translucent(ish), add the garlic.  Stir well to combine.  

Drop in the shrimp.  If the shrimp is fresh or raw, cook it until it is white with red, about 3-4 minutes.  If it has been cooked, only heat it through. With shrimp you also need to remember not to overcook it.  You do not want rubber shrimp. 

Pour in the cream, grind in the pepper, and squeeze the limes over the shrimp.  Give it a good stir, allow the cream to heat for 1 minute then turn off the heat.  Add the parmesan cheese.  Don't stir, the hot pasta will melt it. 

With tongs, lift the pasta from the water and immediately add it to the shrimp mixture.  This adds just a wee bit of cooking water to the cream and cheese so it doesn't get too thick. Mix the pasta by turning it over and over in the sauce until it is completely covered.  Serve.

All you need to accompany these two dishes, is a small cucumber and tomato salad with a bit of red onion sliced over the top and a spritz of mild vinegar or lime juice.

As seen on:

As seen on: